Introduction
Your project is setup. Now it is time to begin building a dimension data flow, and the first step in our data flow is a stage processes. In this video, we will create a process which will collect data from a sample CRM data source, move the data to our destination environment, and load a stage table.
Required
Complete the first video in this series titled “Project Setup”. We’ll be using the connections we created in the first video when we create a stage component in this video.
Recommended
In a perfect world, you will be working within a test SQL Server environment while following along with this video. If you don’t have a test environment, then don’t sweat it. All the resources you need are linked to below.
Instructions
Follow along with the video to complete the following steps. Remember, we are here to help. Let us know if you get stuck, and we will quickly unstuck you. support@leapfrogbi.com
Step 1: Download Profile Generator (optional)
If you don’t have a SQL Server test environment to work it, then you can still download the profile generator to check it out although you will not be able to generate a profile. That’s okay because you can download the profile that you will need from the below resource section when you get to step 4.
- Navigate to the platform login page.
- Enter the credentials you provided when your account was created.
- Forgot your password? No problem; select the Reset Password link on the login page.
- Forgot your username? Send a request to support@leapfrogbi.com. We will look it up.
- Hover the “Stage” top menu item and select “Bulk Profile”.
- Download the Profile Generator to you target environment. Ensure that the profile generator version is in sync with the version of SQL Server you are running. If it is not, then go back to the project list and set update your target environment before downloading the generator.

- Extract the profile generator to a directory of you choosing. To keep things tidy you may want to save the generator to the parent directory of the deploy location you set in the prior video.
Step 2: Create Sample CRM Database (optional)
If you do not have a SQL Server test environment to work in, the you will not be able to create a sample database. No big deal. You should follow along with the video, but you can skip this step.
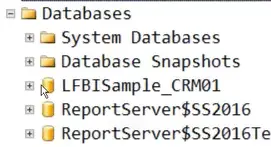
- Download the SQL script named “LFBISample_CRM01” from the resource section below.
- Execute the script using SSMS.
- Verify that you now have a LFBISample_CRM01 database with sample data loaded.
- Download the SQL script named “Product_Source” from the resource section below.
- Execute the script using SSMS.
- Verify that the resulting dataset includes a list of products.
Step 3: Generate a Profile (optional)
Again, if you do not have a SQL Server test environment, then you will not be able to generate a profile. But, you can download the profile you need from the resources list below. Just be sure to set your LeapFrogBI project target system to SS2016 because the profile below was generated using the SS2016 profile generator.
- Copy the Product_Source sql to your clipboard. ctrl + c
- Open LeapFrogBIBatchProfileGenerator.xls which was included in the download from step 1.
- Delete the sample profile configuration on row 3 & 4.
- Complete one profile configuration on row 2 using the following values.
- Profile Type = OLEDB
- Connection String = Edit the existing connection string to match your environment. See the video if you need help with this. you can also download the workbook we used in the video from the below resource section.
- Profile Name = Product
- Source SQL Expression = Enclose the Product_Source sql script (on your clipboard) in quotes. ie “Select …”
- Remove any parameter value in column E, F, G, and H.
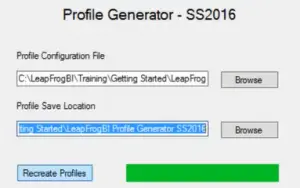
- Start the LeapFrogBI Profile Generator SS####.exe by double clicking on it. If needed, go to the properties (right-click) of the file and unblock it.
- Provide the path to your configuration.
- Provide a path for the generated profiles to be saved.
- Click the “Create Profile” button.
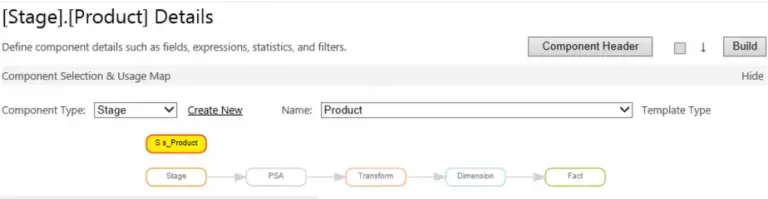
Step 4: Create a Stage Component
- In LeapFrogBI hover the “Stage” top menu item and select “Create New”.
- Select the SQL Native Client stage component type (s1000).
- Complete the following component header fields.
- Name = Product
- Description = Product and category list.
- Profile Upload
- Browse to the profile generated in step 3 above named “Product.dtsx”.
- If you were not able to generate the profile, then download the profile from the below resources section. Before uploading, be sure your project target system is set to SS2016 as the linked profile was generated by the SS2016 profile generator.
- Click the “Upload” button. The profile will be uploaded, and you will see a success message.
- Source Connection = Select the connection named “Source”.
- Destination Connection = Select the connection named “Destination”.
- Click the Save button. You should not see a usage map with a single stage component highlighted.